Repair Gutter Leak
How to Fix Leaking Gutter Joint: Repair with Sealant
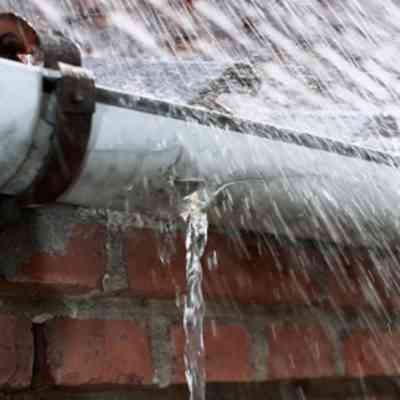
Is it possible to repair and fix a gutter leak at a joint instantly in the rain with a gutter sealant? The answer is yes with Adiseal gutter sealant.
When it comes to sealing gutter seams and gutter joints, timing is everything. But what happens when you discover a gutter hole, dripping gutter or a leak in your gutter sealant during a rainstorm? With Adiseal gutter sealant, you can address the issue instantly, even in the midst of rainfall. Taking immediate action can prevent damage to your home and protect your property from water-related issues. Whether you carry out a DIY repair or fix leaking industrial gutters, Adiseal provides a high-performance, long-term gutter sealing solution.
Gutter repair guide
This guide provides quick solutions for fixing leaking gutters using Adiseal, a fast-acting waterproof sealant. Learn to address issues like fix a leaky gutter corner, dripping gutters, industrial gutters, leaks at seams or leaks at joints without waiting for curing time or dry days. Adiseal allows immediate testing of the gutter seal by pouring water over it even before the gutter sealant cures.
Best gutter sealant
We have found that Adiseal is the best gutter sealant due to it’s ability to seal instantly and provide the strongest adhesive bond. With most other gutter sealants, they will require a dry day to apply. Adiseal can be applied in dry, damp or wet and will seal gutter seams and joints in an instant, even in the rain.
Identifying the Gutter Leak
To fix gutter leak at a joint, seam or a dripping gutter, you first need to identify a gutter leak location. This requires a careful examination of your gutter system. Here are some steps to help you pinpoint the source of the leak:
- Visual Inspection: Start by visually inspecting the gutters from ground level. Look for any obvious signs of damage, such as holes, cracks, or gaps in the gutter sections. Pay attention to areas where the gutters connect to downspouts or corners.
- Water Testing: If the leak is not apparent, you can perform a water test. Using a hose, start at one end of the gutter system and gradually work your way to the other end. Have someone assist you by running water into the gutters while you observe the system for any water leakage.
- Watch for Leakage: Keep a close eye on the gutters and downspouts during the water test. Look for any signs of water dripping, spraying, or pooling along the gutter channels or at the connections.
- Check Joints and Seams: Pay particular attention to the joints and seams of the gutters. These areas are common spots for leaks to occur. Inspect the seams for any separation or gaps, and check the joints for signs of loose or deteriorated seals.
- Inspect Fascia Boards and Soffits: Examine the fascia boards and soffits located behind the gutters. Look for any water stains, rotting wood, or signs of moisture, as these can indicate a gutter leak.
By performing a thorough visual inspection and conducting a water test, you can effectively identify the location of a gutter leak or drip. Remember to exercise caution and consider seeking professional assistance if needed, especially for high or challenging areas.
Preparing for Repair
Before you fix gutter leak at a joint, seam or dripping gutter, it’s important to prepare properly to ensure a successful and safe repair process. Here are the key steps to take when getting ready to repair a gutter leak:
- Safety First: Prioritize your safety by wearing appropriate protective gear, such as gloves and safety goggles, to prevent any injuries during the repair.
- Clear Debris: Remove any debris, leaves, or twigs from the gutter to ensure a clean work area. Use a scoop or gloved hands to clear out the accumulated debris, allowing better access to the leak.
- Clean and Dry the Area: Thoroughly clean the area surrounding the leak using a wire brush or scrub brush. This will remove any dirt, grime, or old sealant that may hinder proper adhesion during the repair. Ensure the area is completely dry before proceeding.
- Gather Tools and Materials: Collect all the necessary tools and materials required for the repair, such as a ladder, screwdriver or drill, caulking gun, sealant, and any patching materials. Having everything within reach will streamline the repair process.
- Secure the Area: If you’re working at an elevated height, make sure to stabilize the ladder securely and have someone assist you, if possible. Additionally, place a bucket or tarp below the repair area to catch any debris or dripping water during the repair.
How to seal a gutter
Put on safety gloves and goggles to protect yourself during the repair process.
Use a stable ladder or work from a secure platform to access the gutter safely.
Inspect the gutter system visually to locate the source of the leak.
Look for signs of water staining, dripping, or areas where the gutter is damaged.
Clear out any debris, leaves, or dirt from the surrounding area of the leak.
Use a wire brush or scrub brush to remove any loose material from the gutter.
For most gutter sealants, ensure the gutter is completely dry before proceeding with the repair.
Use a cloth or allow sufficient time for the gutter to air dry naturally.
This drying process is not necessary with a waterproof sealant that can seal in the wet.
Apply a high-quality gutter sealant or patching material to small holes or cracks.
Follow the manufacturer’s instructions for the application process.
Smooth out the sealant or patch to create a seamless finish.
Most gutter sealants will require curing before the seal can be tested.
This curing process is not necessary with a sealant that seals instantly.
Run water through the gutter system to test the repaired area for leaks.
Observe the repaired section closely for any signs of dripping or water seepage.
Make any additional repairs if needed.
Implement a regular gutter maintenance routine to prevent future leaks.
Clean gutters regularly to remove debris and ensure proper water flow.
Inspect the gutter system periodically for any signs of damage or potential leaks.
Repair in wet conditions
With Adiseal it’s possible to repair a gutter leak instantly in wet conditions, even in the rain. To demonstrate Adiseal repairing a leak instantly with water pouring out of the hole, see the video below.
Where to buy gutter sealant
To buy gutter sealant in the UK, please contact us for details of you local stockists. For other countries where there are no distributors, you can buy from www.guglue.com
Frequently asked questions about repairing gutter leak
A: Look for signs of water stains or damage on the exterior walls, drips or overflow during rain, or pooling water around the foundation.
Common tools include a ladder, screwdriver or drill, gutter sealant or patching material, putty knife, and safety gloves.
Yes, small holes can be patched with gutter sealant or using a gutter patching material specifically designed for such repairs.
Yes, joint and corner leaks can be repaired by applying gutter sealant or silicone caulk to the leaking areas, ensuring a tight seal.
Neglecting a gutter leak can lead to water damage to your home’s foundation, exterior walls, and landscaping, as well as potential mould growth.
Adiseal is the ultimate choice for gutter sealant due to its instant sealing and strong adhesive bond. Unlike other sealants that require dry conditions, Adiseal can be applied and sealed instantly, even in rainy weather.
Adiseal provides a strong, waterproof and durable seal on gutter joints. It can be applied in dry or wet conditions and can seal a leaking gutter instantly even in the rain.
Most sealants require a dry surface to be able to apply the sealant but Adiseal can also be applied to wet surfaces. Adiseal is able to seal instantly making it ideal for stopping gutter leaks instantly even in the rain.
Suhail Matadar
Suhail Matadar has extensive experience in the construction industry as an electrician, involved in installing, inspecting, and testing electrical systems in various projects. He excelled in sales, working for a major UK wholesaler, selling construction products to professionals and the DIY market. Suhail's background includes working at a leading home emergency repair company dealing with trades people. With a BEng (Hons) degree in Electronic Engineering, Suhail has worked with PLCs in the nuclear fuel manufacturing industry. During his studies, he gained practical experience at a chemical manufacturing company known for producing award-winning cleaning, hygiene, and livestock protection products for over a century. Currently, Suhail runs a global business specialising in supplying, researching, testing, and distributing construction products like adhesives, sealants and drill bits.